In simplest terms,
iron sights are sturdy pieces of metal atop your rifle that need to be visually lined up. As you’re looking at the target, your goal is to line up the iron sights with each other and to place them over the correct portion of your target.
In practice, of course, there is more than one way to go about this.

Looking through the classic iron sights on a Springfield 1903.
There should be two iron sights on your rifle. The one at the rear, closer to your eye, is the rear sight. The one nearer the muzzle is known as the front sight. Just as you need two points to draw a line, you’ll need two pieces of iron sights to line your barrel up with the proper ballistic path.
How are Iron Sights Attached?
Iron sights will typically be fastened to your barrel and/or receiver. They’re smaller and more lightweight than other sights, so the methods of attachment can vary quite widely. (They will also normally be the kind of sights installed by the rifle manufacturer, as opposed to a scope or red dot)
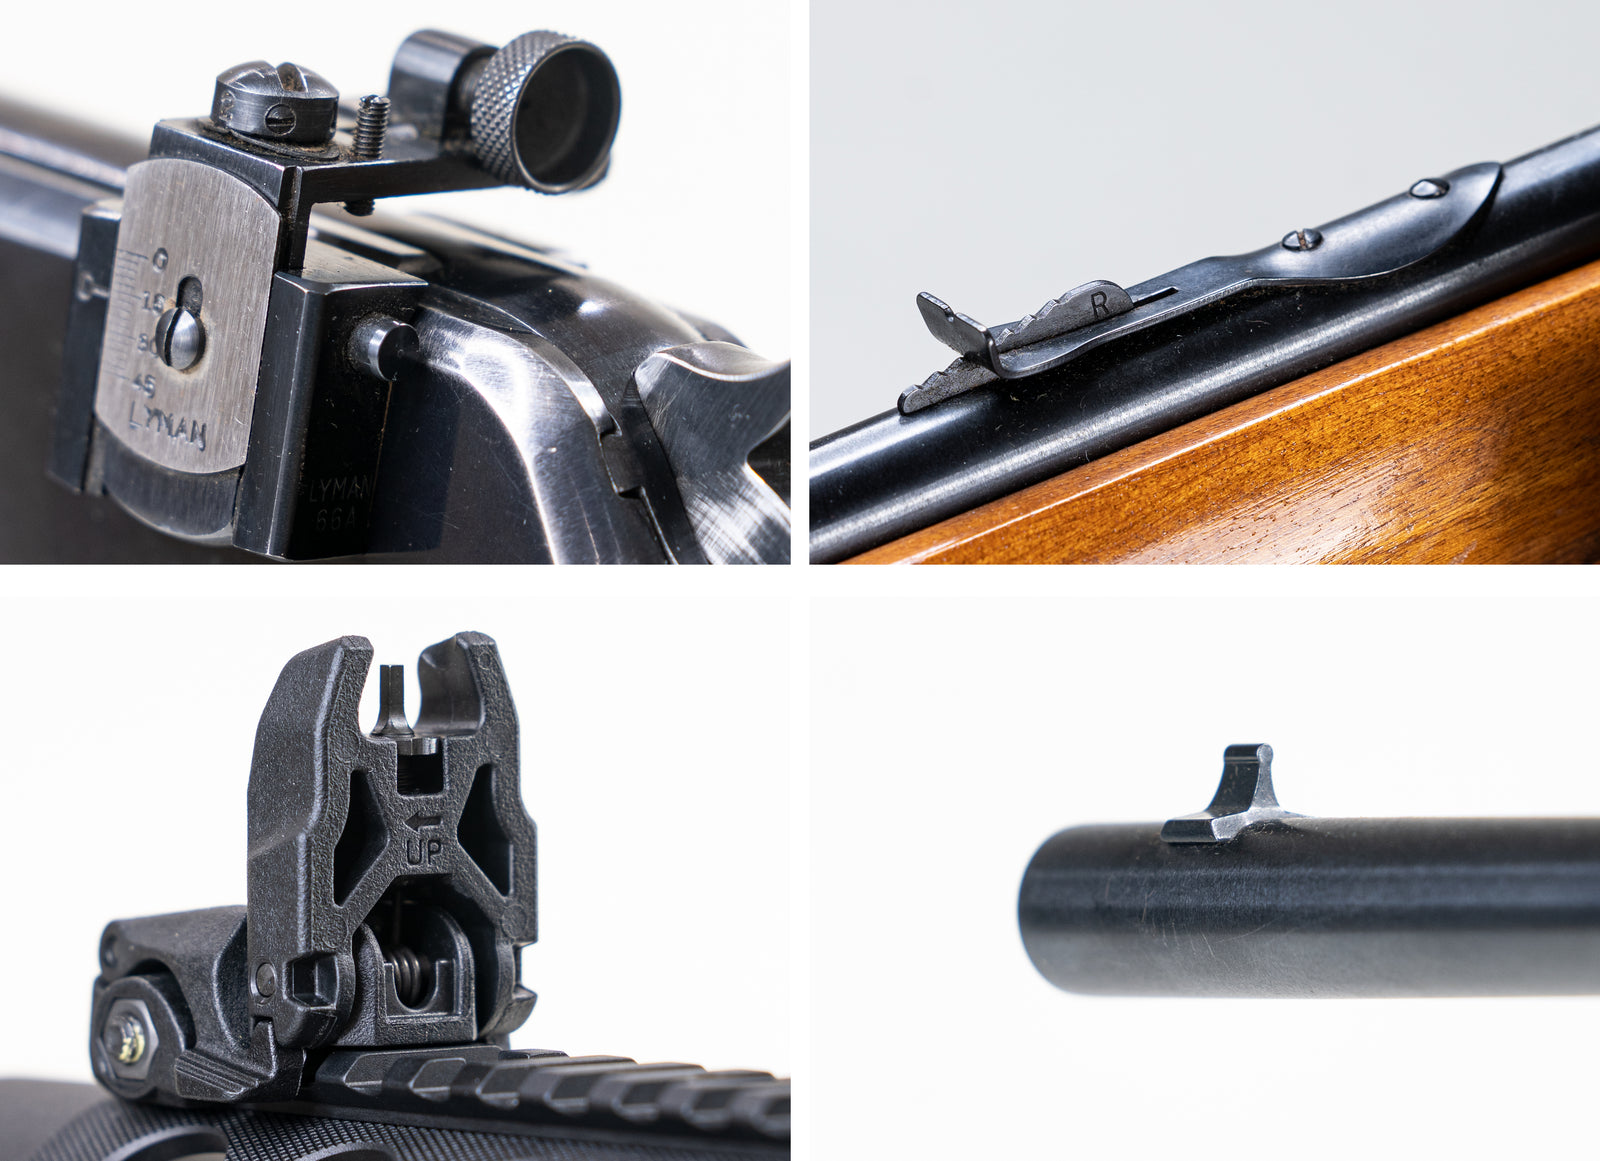
Iron sights may be fastened by means of screws, a grip onto a rail (a mounting point of standard width and variable length, such as Picatinny), or a dovetail (a trapezoidal cutout into the barrel).

A mix of iron sight attachment styles. From the upper left and proceeding clockwise: Receiver (screws), barrel (screws), barrel shroud (Picatinny rail), barrel (dovetail).
Are Iron Sights Precise?
The farther apart these two sights lie, the more precise you can be with your aim. On a handgun, where the sights are located just a few inches apart, long distance accuracy is only a distant possibility. Small changes in aim are difficult to notice, resulting in shots off target despite how perfectly the sights seem to line up. A longer distance between the front and rear sights, known as the sight radius, will cause each shift to be more visually apparent.

A simple diagram of how iron sights and trajectory come together to reach the target.
The other potential problem of aiming with iron sights comes from their thickness. The front sight is usually a thin blade of metal. At close distances, this works quite well in allowing you to line up the target. At longer distances, as the target looks smaller and smaller, the target may eventually become smaller than the front sight. This is akin to holding your thumb out at arm’s length and using it to cover up the moon in your vision. When the target is smaller than your front sight, it becomes difficult to see and aim at the target.

A 10” target at 100 yards and then at 200 yards, with the eye’s focus on the target. At 100 yards, this particular front sight is equally as wide as the target. At 200 yards, another 10” target appears very small and can potentially be obscured by the front sight.
Open vs Aperture Sights
Iron sights are broadly divided into two categories: Open sights and Aperture sights. The difference between each lies almost exclusively in the construction of the rear sight. I’ll get into the specifics just after this, so suffice to say - aperture sights have you looking through an opening (usually a small hole), while open sights are open to the sky.

Two styles of rear iron sights; atop is an open sight, below is an aperture
An aperture sight is also known as a peep sight. The front sight will be a blade, aperture, or post installed near the muzzle. The rear sight will have the aperture, usually in the shape of a small cup with a hole through the middle. Alternatively, the aperture may be a plate with a hole drilled through it. Your goal is to line up the tip or center of the front sight with the middle of the aperture.
Each person will mount their cheek to the rifle and turn their face in a unique way, so the alignment for one person may not be precisely the same for another. Fortunately, the human eye is quite fond of lining up items evenly, even without conscious thought.

A precision iron sight, make with a very small aperture. Though this makes lining up a shot somewhat slower than a large aperture, the added precision makes up for it at the shooting range.
Aperture sights are typically the most precisely adjustable variety of iron sights. They’re made for precision, and will have adjustments that take advantage of that. Well-made aperture sights will have adjustments for windage (left-right) and elevation (up-down). Depending on the age and version of the sights, you may have adjustments marked in MOA or in rifle/load specific distances.

Two styles of rear aperture sights and their markings. On the left, a Springfield M1903’s sight marked for yardages. On the right, A Winchester ‘92 with an added Lyman sight, marked with a simple index.
How Do I Aim?
Most people can quickly place the upper edge of the front sight right in the middle of the aperture sight. The eye likes to find balance and can do so intuitively. For either open or aperture iron sights, the eye should focus on the front sight when finally ready for the shot. The target will be blurred, as will the rear sight. When using an aperture sight, this blurring will create a rather interesting effect - the outer edges of the viewing space will darken and blur, while the very center will be sharp and bright. This allows your eye to very easily line up the top of the front sight with the center of the viewing window.
Repeatability is key to aiming reliably. If you can consistently line up the front and rear sights in the same way, you can use them to aim. If you misalign them, your aim will be off. The blurring of the rear sight creates a peculiar little window that makes alignment much easier.
An open sight doesn’t usually have the same benefit. Without practice, it can be difficult to properly line up the front sight. Still, either open or aperture sights can certainly be used to the limits of your eye’s capabilities.

Lining up an aperture sight can become quite intuitive - the blurring of the rear sight guides the eye to place the post at the center of the view.
Open sights are quicker at target acquisition than aperture sights, but are also more prone to being slightly misaligned. They’re also among the cheapest sights produced (in terms of cost) and mechanically the simplest. The rear sight may or may not have adjustment for wind, but usually has a simple and rough adjustment for elevation.
These sights have a front bead or post that is substantially the same as an aperture’s front sight. The rear sight, however, will look like a short ledge with a notch cut out. Some rear sights will look like a pair of pillars with an opening between them.

A rear and front sight installed on an old Remington 514 bolt action rifle
For open sights, the goal is to line up the front sight with the rear sights, such that the tops of all 3 points line up. You should have a straight horizontal line that goes from the left side top of the rear sight, across the top tip of the front sight, and then across the right side top of the rear sight. In addition, the front sight should be centered between the rear sight’s sides. Some iron sights have a series of dots - one on each face of the rear sight and one on the front sight - that can be lined up instead.
This arrangement of open sights is somewhat less intuitive than an aperture sight. Your eye may spend a bit of extra time switching its focus between the rear sight, front sight, and target. The better your eye can maintain good focus, the faster you can reliably aim an open sight. In any case, the front sight is the most critical component to focus on when aiming - aside from the target, of course.

A look through a simple set of iron sights. With a thick front post and small rear sight, it may be difficult to get a clear view of the target.
How Can I Shoot Farther?
To combat issues of seeing the target, you may set up your iron sights to aim a bit below the target. Instead of centering the front sight on the bullseye, you may set the target to stand on top of the front sight - which is known as a 6 o’clock hold. This works best when shooting a circular target at a known distance.
Another solution to the problem of distance/target size lies in acquiring a thinner front sight. There is an eventual limit, though. The front sight can’t become so narrow that it’s difficult to see, or else it can’t serve its purpose. The minimum thickness of your front sight depends on your eye’s own abilities.

A view through an aperture sight. The target is 20” at 100 yards. With your eye focusing on the front post, the rear aperture fades into a blurry guide to help center the front post. The target is also blurry, but usually quite easy to notice and line up.
Other Notes
The eye works harder using an ironsight than using other sights. Though impressively capable, your Mk.I Eyeball may have to rapidly switch focus from the rear sight to the front sight, then to the target, then back through the front and rear sight again. The sights have to be aligned with each other and with the target, requiring plenty of visual confirmation as your grip and stance shift the rifle. On top of this, iron sights offer no prescription correction or magnification. Your vision will have to be capable of focusing at all the required distances in order to see all the elements in play.
That all being said, I’ve known plenty of shooters who can reliably use iron sights out to 500 or 600 yards. In some stages of the CMP (Civilian Marksmanship Program), iron sights must be used at distances of up to 600 yards. At the end of the day, your capabilities with iron sights will rely on your ability to see the target, your eye’s ability to focus on the front sight, and your skills with the rifle. At such a distance, it will also likely be necessary to adjust your point of aim / point of impact such that the target sits above the front sight.
To my knowledge, the farthest target ever reliably hit with iron sights was 3200 yards distant. This was accomplished by R. T. Hare of Springfield Armory in 1879, during rifle and cartridge testing at Sandy Hook. To be fair, his target was literally as big as the broad side of a barn (22 feet tall by 44 feet wide). Perhaps more famous is Billy Dixon’s shot in 1874, with which he knocked the rider off a horse at 1538 yards.
All I’m trying to say is - it’s sometimes tough, but you can shoot pretty darn well with iron sights.


Leave a comment (all fields required)