Click to open the 'Scope Helper' menu.
This menu will narrow down the information displayed on the page.
Click the headers and buttons to be redirected to that subject
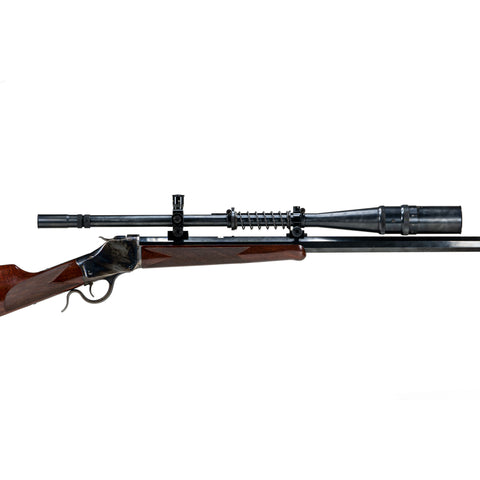
Scope Overview Get That Scope Mounted Differences Between Scopes Part Compatibility Once upon a time, scopes were very different from their modern counterparts. In
1776, the first ever rifle-mounted
telescope was tested. After a short lesson in eye relief, inventors rushed to test new ideas
in rapid succession. Reticles were installed, made from spider silk or hair. Illumination was tested, though candles can be a bit tough to work with at times. Eventually, in the mid 1800s, brass tubes were traded in favor of drawn steel tubes. From there,
functional
designs flourished.
Once upon a time, scopes were very different from their modern counterparts. In
1776, the first ever rifle-mounted
telescope was tested. After a short lesson in eye relief, inventors rushed to test new ideas
in rapid succession. Reticles were installed, made from spider silk or hair. Illumination was tested, though candles can be a bit tough to work with at times. Eventually, in the mid 1800s, brass tubes were traded in favor of drawn steel tubes. From there,
functional
designs flourished.
After Charles Willson Peale’s experiment in 1776, scopes remained relative curiosities until around 1850. It was then that designers such as Chapman, James, and Malcolm built scopes that could survive more than a few shots. Fortunately, manufacturers and gunsmiths were making rifles precise enough to make use of the magnification.
Our Malcolm line of scopes pays homage to the well-renowned scope makers of old. William Malcolm and John Unertl provide two of the main inspirations, though the Chapman-James team also had designs with some merit.
What follows is a dive into the different designs we make today. These scopes are inspired heavily by their centuries-old counterparts, though include some modern upgrades that improve their functionality dramatically. Say goodbye to spider silk reticles!
This article will examine externally-adjusting Malcolm scopes. I’m glossing over scopes such as the M73 (Weaver 330C), M82 (Lyman Alaskan), and M40. Those three are a little too modern for this online guide.
|
Length |
Weight (with mounts) |
Mounting Style |
Adjustment Style |
Tube Style |
|
17” (3X) 18” (6X) |
17.5oz (17”) 18oz (18”) |
Posa-cut blocks |
Clickless “Cage” |
Straight-tube, ¾” main diameter |
 Both the 3X and 6X Short Malcolm scopes are quite similar in appearance. With impressively strong drawn-steel tubes, these short Malcolms hearken back to an era of optics epitomized by the Winchester A5. Scopes of this style have been out in the world since the days of the Chapman-James scopes, at home on rifles such as the
Winchester 94 and the Whitworth.
Both the 3X and 6X Short Malcolm scopes are quite similar in appearance. With impressively strong drawn-steel tubes, these short Malcolms hearken back to an era of optics epitomized by the Winchester A5. Scopes of this style have been out in the world since the days of the Chapman-James scopes, at home on rifles such as the
Winchester 94 and the Whitworth.
In the kit, the scope comes with the front and rear rings, the appropriate Posa-cut blocks, and hefty thread-in lens covers. The arrangement is built to hold the scope steady, without the recoil sliding found in some of our other models.
To mount the scope, the rings are slid onto the blocks and the crossbolts are tightened in place. Commonly, the blocks are screwed onto the barrel - the barrel may need to be drilled and tapped. Sometimes, though, one of the blocks may go on the receiver. Depending on the model of rifle, we may have kits to utilize existing holes and clamping surfaces to mount the scope without drilling and tapping for the blocks.
Sliding Ring Replacement: Out of the box, this scope is built to stay still. When the rifle fires, the scope should not slide. However, there are some situations and historical setups where you may want your scope to slide. In that case, the front locking ring can be swapped out for a sliding lock ring, which enables the scope to slide. To fit the standard front ring, use the 17SLR.
|
Length |
Weight (with mounts) |
Mounting Style |
Adjustment Style |
Tube Style |
|
18” |
18oz |
Crescent-cut blocks |
Clickless “Precision” |
Straight-tube, ¾” main diameter |

Though similar in shape to the 3X and 6X all-black scopes, this particular variation makes a nod to even older scope designs. Once upon a time, brass dominated the field for scope tubes. Brass tubes had problems with internal reflections and flaky coatings. The Two Tone scope keeps the brass to the objective housing and the eyepiece, with a non-reflective steel tube for the main body. If your rifle has a brass receiver and a steel barrel, this particular scope should look right at home.
In the kit, the scope comes with the front and rear rings, two-sided Posa and Crescent cut blocks, and hefty thread-in brass lens covers. The scope is built to slide, handling recoil with ease - just remember to pull it back after each shot!
To mount the scope, the rings are slid onto the blocks and the crossbolts are tightened in place. Commonly, the blocks are screwed onto the barrel - the barrel may need to be drilled and tapped. Sometimes, though, one of the blocks may go on the receiver. Depending on the model of rifle, there may be kits to utilize existing holes and clamping surfaces to mount the scope without drilling and tapping for the blocks.
|
Length |
Weight (with mounts) |
Mounting Style |
Adjustment Style |
Tube Style |
|
23” |
25.4oz |
Crescent-cut blocks, 1903-specific |
Lyman (gen i) Unertl (gen ii) Click adjustments |
¾” main diameter tube, objective bell with 31mm lens |

A studied redesign of the classic Unertl 8X scope found on the Marines’ 1903A1 and Model 1941 rifles. If you’ve ever seen a shot of Carlos Hathcock, you’ve probably seen this scope. We currently have two versions of the classic 8X, with the differences existing largely in the rear ring (where the turrets are found). Both versions of the scope have adjustable parallax, changed by removing the sun shade and then rotating the parallax adjustment ring. The Gen ii version of the scope utilizes Unertl style turret adjustments, while the Gen i has Lyman adjustments.
In the kit, the scope comes with the front and rear rings, the Crescent-cut blocks meant to fit on a Springfield 1903, and thread-in lens covers. The scope is built to slide, handling recoil with ease - just remember to pull it back after each shot! The Gen i comes with a spring in the kit, while the Gen ii (built for CMP competitions) does not have a spring. A spring can be acquired separately if you’re interested.
To mount the scope, the rings are slid onto the blocks and the crossbolts are tightened in place. Commonly, one block is installed on the receiver and one is installed on the barrel. Depending on the version of 1903 that you’re installing this on, it may need to be drilled and tapped. Additionally, a portion of the wood guard may need to be cut away for the front block and ring to fit.
|
Length |
Weight (with mounts) |
Mounting Style |
Adjustment Style |
Tube Style |
|
25.75” |
32oz |
Crescent-cut blocks, tall |
Unertl click adjustments |
¾” main diameter tube, objective bell with 41mm lens |
Reviving the classic Unertl ‘Target Spot’ design with modern hardware, our 20X Malcolm is the perfect pairing for classic precision rifles. Commonly found atop a Model 70 or a well-machined .22 cal. The parallax in the 20X is quite easily set by twisting two rings on the objective bell - one to drive the lens housing forward, the other to move backward.
In the kit, the scope comes with the front and (Unertl-style) rear rings, Crescent-cut blocks tall enough to clear the objective bell, and thread-in lens covers. The scope is built to slide, handling recoil with ease - just remember to pull it back after each shot!
To mount the scope, the rings are slid onto the blocks and the crossbolts are tightened in place. The rifle will have to be drilled and tapped to install the blocks.
|
Length |
Weight (with mounts) |
Mounting Style |
Adjustment Style |
Tube Style |
|
30.5” main tube + 3”-9” sunshade |
29oz (depends on sun shade) |
Heavy Duty Base (screws), 2x Dovetails |
Vertical ‘bunny ears’ and horizontal sliding platform |
¾” straight tube, sunshade attached to objective housing |

Once upon a time, William Malcolm made scopes as long as the barrel of the rifle - and sometimes even a little longer, for proper eye relief. If you’ve ever seen “3:10 to Yuma”, you’ve seen one of these being used on a rare revolving rifle. Though these scopes began cropping up toward the end of the Civil War, they became more common afterwards in hunting applications. Malcolm originally made these scopes in magnifications up to 20X, though the 6X was the most popular.
In the kit, the scope comes with the front ring, bunny ears setup, ⅜” dovetail, heavy duty base plate, and thread-in brass lens caps. The arrangement is built to hold the scope steady, without the recoil sliding found in some of our other models.
Mounting this scope can, at times, be a little tricky. Generally speaking, the rifle needs two dovetail cuts along the barrel - one near the muzzle (typically used by the front sight), and one back near the receiver (used by the rear iron sight). Depending on the cartridge and rifle weight, you’ll then also have to drill and tap 1 to 2 more holes near the rear dovetail in order to fasten down the heavy duty base.
Different Dovetail Sizes: Your rifle may have dovetail cuts outside of the standard ⅜”. The dovetail block is replaceable, and we have multiple sizes available. Please measure your rifle’s dovetails, and give us a call if you’d like to confirm.
Different Sunshade Lengths: The scope is meant to reach to the end of the muzzle, to make sure of the dovetail found there. Depending on the length of your barrel, you may need a sunshade other than the 5” shade in the kit. The sunshade threads into the objective housing, and takes only a few moments to replace. As a general rule of thumb,
28” barrel = 3” sunshade
30” barrel = 5” sunshade
32” barrel = 7” sunshade
34” barrel = 9” sunshade
Fine Elevation Adjustment Kit: This set of parts attaches to the bunny ears, providing a vertical screw adjustment for making fine corrections on the fly.
Offset Mounting Kit: For round-barrel rifles that might have difficulty mounting the long in-line, this set of parts includes an offset plate and offset front dovetail clamp. The offset plate replaces the normal heavy duty base, giving the scope a mounting point to the left of the barrel. Meanwhile, the front dovetail ring clamps around the barrel and provides an extended dovetail cut so that the front of the scope can be positioned properly side-to-side. Please measure the diameter of your barrel to ensure you select the proper clamping ring size.
|
Length |
Weight (with mounts) |
Mounting Style |
Adjustment Style |
Tube Style |
|
30.5” main tube + 3”-9” sunshade |
29oz (depends on sun shade) |
Direct Dovetail (2X) |
Vertical ‘bunny ears’ and laterally adjusting front ring |
¾” straight tube, sunshade attached to objective housing |

Towards the end of the 1800s, William Malcolm designed a change to the mounts on his long ‘Rifle Telescope’. This change, known as the “C Type Mountings,” was a sturdier alternative to the earlier “A” and “B” offset mounts. While Malcolm’s design was ahead of its time, it certainly had a few limitations. It could be damaged by recoil, had limited elevation adjustment, and required a screwdriver to adjust the windage. We’ve maintained his stylistic choices while updating nearly every aspect of his Type C mounts - with stronger alloys and tighter tolerances, increased elevation range, tool-less windage adjustment, and a structure that allows the scope to slide to avoid recoil. In short, we’re certain it’s what Malcolm would have done if he had a CNC machine.
At the time of my writing this, this particular kit is not yet available. When it is: In the kit, the scope comes with the windage front ring, bunny ears setup, and thread-in brass lens caps. This setup is designed to allow the scope tube to slide - preserving both the scope and the dovetails against the recoil of a strong cartridge.
Mounting this scope involves assembling a number of small parts. Everything ties down into the dovetail cuts, so the mounts take up relatively little room. Once the dovetails are inserted and the set screws are locked down, all the other parts are installed and the scope tube is finally inserted into the apparatus.
These old scopes mount up somewhat differently from modern Picatinny rail setups. Depending on the scope in question and the rifle it’s going on, there are a whole mix of elements at play. I’ll walk through the main elements first, then we’ll look at some unusual examples.
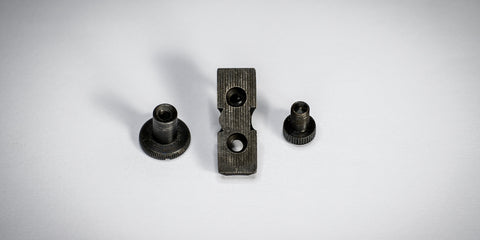
Block. This is the age-old precursor to the rail. Some old scopes, like their modern counterparts, have two rings that need to grip onto something. Rather than grabbing a rail, each ring grabs onto a ‘block’. The blocks have a small divot cut into the side, where the ring’s crossbolt locks into place. Two classic crossbolt shapes have stood the test of time: the ‘Posa’ cut and the ‘Crescent’ cut. The correct block for your rings is the block that has the correct crossbolt cut. Depending on how much clearance you need, blocks are also available in different heights. These blocks are fastened onto the rifle, usually by drilling and tapping the barrel. Since the blocks are meant to stay in place (much like a rail), loctite is recommended. Most blocks are ½” across at the top, and have sides sloping inward at 60 degrees. The block is sometimes referred to as the ‘base,’ as in “½” 60 degree base.”
Crossbolt. As mentioned above in the section on ‘blocks,’ the block will have a cut made into the side. Once a ring is slid onto a block, the ring’s crossbolt is tightened into place. This crossbolt locks into the cut on the side of the block. Our scopes use the two most popular of the many historical crossbolt styles: Posa and Crescent. Posa cuts are flat-faced, and have a crossbolt that looks like a standard flat-tipped bolt. Crescent cuts look like a crescent moon or half-bowl, and have a crossbolt with a bowl-shaped tip. Crescent cuts are more likely to return to the exact same mounting point, as the bowl shape helps center the ring when the crossbolt is tightened in place.

Dovetail. This word, at times, refers to two sides of the same coin. Cut into the barrel may be a trapezoidal shape, running left-to-right across the top of the barrel. This cut is known as the ‘dovetail cut.’ Many old rifles will have two dovetail cuts, which are normally occupied by the front and rear iron sights. The piece that slides into the dovetail cut is known as the ‘dovetail block.’ It’s shaped to slide into the dovetail cut, and needs to be the same size (measuring from the front edge to the rear edge). Some dovetail blocks are meant to be a little loose, and lock in place when a central set screw is tightened. Other dovetail blocks are meant to be a very tight fit, and may need to be lightly hammered into place. The word ‘dovetail’ may refer at times to either the ‘block’ or the ‘cut’.
|
Pederoli |
Chiappa / Armi Sport |
Uberti |
C Sharps / Shiloh |
|
|
Front |
⅜” |
⅜” |
⅜” |
0.435” |
|
Rear |
½” (older) ⅜” (newer) |
⅝” |
⅜” |
0.475” |
Plunger. Modern scopes have springs inside that keep the internal ‘erector unit’ pressed against the underside of the turrets. When the turrets are dialed, the erector unit is pushed in the appropriate direction. The spring keeps the erector unit pressed against the turret. In externally-adjusting scopes, the setup is a little different. The turrets are exposed, and the underside of each turret presses against the scope tube. The scope tube is kept pressing against the turrets by a ‘plunger’, which is a fancy metal-capped spring. As long as the plunger can press against the scope tube, the tube will move the proper amount when the turrets are dialed.

Ring. Modern scopes are held in place by a pair of rings, which are in turn clamped onto a rail of some sort. Externally-adjusting scopes have rings too, but with many more functions. Rather than having the adjustments built into the scope body, the adjustments (‘turrets’) are built into the rear ring. The front ring, meanwhile, is there to either hold the scope still or to allow it to slide under recoil. If you think of the front ring as a pivot point and the scope tube as a long lever, the rear ring pushes the scope tube around to point at a particular angle. If you want to reach farther out, you’ll need to point the scope further down.
Old rifles can be quite interesting. They were built when there was a lot of testing and experimentation in small arms, and have many unusual characteristics not found on modern rifles. From top-ejection to exposed hammers, many small factors may influence where and how a scope can be mounted.
Modern scopes are typically mounted in-line with the barrel; that is, directly above it. Old, externally adjusting scopes are often mounted the same way. Mounting in-line with the barrel makes for the easiest head position and cheek weld, and usually requires less ‘hardware’ to move the scope off to one side. If it’s at all possible for your rifle, mounting a scope in-line is usually the best bet.
 Not all old rifles will get along with a top-mounted scope. When the Marines mounted the Winchester A5 or the Unertl 8X on their 1903s, they quickly realized that they couldn’t use stripper clips to load the magazine. Other rifles, such as the
Winchester 73 or Browning 1886, eject cartridges straight up. A scope over the ejection path could bounce a cartridge right back down into the action. And rifles such as an 1874 Sharps have a hammer that - depending on the scope height and hammer width - could slam right into the scope tube.
Not all old rifles will get along with a top-mounted scope. When the Marines mounted the Winchester A5 or the Unertl 8X on their 1903s, they quickly realized that they couldn’t use stripper clips to load the magazine. Other rifles, such as the
Winchester 73 or Browning 1886, eject cartridges straight up. A scope over the ejection path could bounce a cartridge right back down into the action. And rifles such as an 1874 Sharps have a hammer that - depending on the scope height and hammer width - could slam right into the scope tube. Some rifles can tolerate an inline scope while suffering from reduced functionality (like the 1903), while others will suffer from some mechanical issues (like an 1886 in .45-70 that can’t eject a shell).
Scopes are typically offset to the left side. Sometimes this is done through a unique bracket attached to the side of the receiver. Other times, this is done through top-mounted parts that extend off to the left.

We make a number of kits for particular rifles that offset the scope to the side. If your rifle isn’t one that we make a kit for, but is one that still needs the scope to be offset, we have a general ‘offset plate’ for the Short Malcolm scopes. This plate has a block fastened atop it, which the ring will clamp to like it normally would. The extended plate beneath the block is attached to the barrel, just like a block would be - with screws, utilizing drilled and tapped holes.
For the Long Malcolm ‘Drill and Tap’ scope, when mounting on a round barrel, we make a ‘Round Barrel Offset Mount’. This has an offset heavy duty base, which replaces the normal heavy duty base under the rear ‘bunny ears’. For the front ring, we have a clamp-style bracket that tightens around the barrel. This clamp has a long dovetail cut running across the top, providing ample wiggle room for the front ring to move left or right until it’s aligned with the rear mount.
Normally, most old rifles will have a couple of dovetail cuts up on the barrel. These dovetails are taken up by the iron sights. The irons are going to need to be knocked out if you need the dovetail cuts for mounting. Some rifles may also have a few holes drilled along the top; Pedersoli rifles occasionally have two holes drilled and tapped near the rear dovetail, and the Miroku version of the 1885 High Wall should have two holes at the top of the receiver (just forward of the breech block). Other rifles might have holes drilled on the left side of the receiver, such as the Winchester 94 rifles drilled for a Lyman receiver sight (Model 66).
If you don’t want to drill and tap to fasten the blocks or heavy duty base onto your rifle, we may have a kit that makes use of the existing holes and dovetails. Considering how old some of these rifles are, and how they might have been modified throughout history, there’s quite a bit of variability out there.
Certain kits we make may be for one particular rifle or another, and meant to fit either the long or short scope. The kits will be detailed below.
|
Intended Rifle |
Mounting Requirements |
|
Offset |
Removal of the dust cover, removal of rear iron sight. This mount uses the dust cover’s sliding surface and the dovetail at the rear of the barrel. It will offset the scope to the side, to keep it out of the way of shell ejection. Two versions available: Crescent Cut or Posa Cut. |
|
In-line |
Two holes atop the receiver, removal of rear iron sight. This kit has a block that is shaped and sized to sit at the top of the receiver, where there should already be two holes drilled. Meanwhile, a dovetail-mounted block replaces the rear iron sight. Two versions available: Crescent Cut or Posa Cut. |
|
Offset |
Many lever-action rifles of this time period (especially the Winchester ‘92 and ‘94) will have two holes drilled in the left side of the receiver for a Lyman sight. You’ll use these two holes in addition to a dovetail at the rear of the barrel. This may require removal of the rear iron sight if one is pre-installed. |
|
Marlin ‘94/’95 & Henry Big Boy In-line |
These rifles should have two holes drilled on top of the receiver (usually used to mount a rail of some sort). The rear block will use the two holes on the receiver, while the front mounting block will use a dovetail on the barrel. This will require removal of the rear iron sight if one is installed. One version available, with both Crescent and Posa Cuts. |
|
In-line |
This mounting bracket makes use of the rear dovetail on the barrel. First, a dovetail block replaces the rear iron sight. Then, a bar is installed on top of the barrel, tightening down onto the dovetail block. The bar is shaped to fit partially around the octagonal barrel of a Henry Golden Boy. Other rifles may work with this mount, but you will need to verify the distance between the foreguard bands and the dovetail cut, as well as the tang width on the barrel. Two versions available: One for Posa Cut only, and one with both Posa and Crescent Cuts. |
|
In-line |
This mounting kit is made of two key components. One is a serpentine bracket that fastens to two screws on the left side of the receiver. Some Sharps rifles have marginally different receiver dimensions - the bracket may need light grinding where it passes over the bulge for the falling block. The forward mounting point fastens to two holes on the barrel. This may require removal of the rear iron sight. One version available, for Posa-Cut rings. |
|
In-line |
This kit allows a Malcolm Scope to easily mount up atop many classic rimfire lever-action rifles. A particular favorite in the office is the Henry H001. The mount takes the rear dovetail cut (replacing the rear iron sight) to provide a mounting block for the front ring, and clamps another block atop the 11mm rail found on such rifles. Not all rimfire rifles have an 11mm rail atop the receiver - but those that do can easily utilize this kit. One version available, for Posa and Crescent-cut rings. |
|
In-line |
The Buffalo Classic should have a dovetail at the muzzle-end of the barrel, occupied by a front sight. This dovetail will be used for the front ring of the scope. Atop the chamber (at the very rear of the barrel) should be three tapped holes. The replacement heavy-duty-base component will fasten down to these three holes, and the bunny ears will fasten down onto the bracket. |
|
In-line |
This piece provides a mounting space for the bunny ears at the rear of the scope. The bracket mounts onto the four holes pre-drilled on the Green Mountain barrel, back at the rear of the barrel. Please verify that your barrel has these holes pre-drilled, as some may be made to a different specification. |
Our scope kits differ in a few key categories:
Let’s dive in.
The easiest element to start with is the parallax. Only a few of our externally-adjusting Malcolm scopes have an adjustable parallax: the Gen I 8X, Gen II 8X, and 20X. All three have their parallax adjusted at the objective bell. The other Malcolm scopes do not have an adjustable parallax. Their parallax is pre-set at 100yds.
As for the length, the scopes fall into three main divisions: a foot and a half, two feet or so, and nearly three feet (otherwise known as the full length of the barrel). The Long Malcolm Scopes (6X) have a replaceable sunshade. This is offered in different lengths and threads into the objective housing.
Some scopes are built to slide from recoil, such as both 8X (Unertl-style) and the 20X. In fact, the Pope rib, which is meant to keep the scope aligned while it slides, is built into the scope tube itself. Other scopes, such as the traditional short 3X and 6X are not set up to slide right out of the box. A small change in parts, though, can enable the scope to slide quite readily. Meanwhile, the 6X Two Tone and the longer ‘Sliding Six’ (30” 6X) are set up to slide. They are based on non-sliding models that have been set up to slide, and can be set up to not slide. I’ll get into the why and how a little later.
We’ve got a mix of external adjustment setups. The chart below is talking about the setup that comes in the box. Each scope has a ¾” main tube, so there’s quite a bit of compatibility.
The longest scopes we make utilize bunny ears for scope adjustment. The bunny ears are a pair of pillars, positioned to hold the scope tube between them. The scope tube can be moved up and down between the ears to change the elevation adjustment. The scope is then locked in place by tightening a crossbolt.
All of our short(er) scopes utilize turret adjustments. These turrets work quite similarly to modern turrets - simply turn, and an adjustment will be made. Some turrets have clicks when they turn, while others are clickless. The rear ring holds both of the turrets, as well as the spring that keeps the scope tube pressed up against the undersides of the turrets. As long as the spring (and attached plunger) are working, any adjustments made in the turrets should hold true.
As a side note - One question we get asked is: Can I put the Unertl rings on the long (~30”) Malcolm scope? The short answer is - technically, yes. But this is not recommended. The scope is very long, requiring quite a bit of movement for each adjustment. It is usually mounted on classic rifles, which need a lot of vertical adjustment to account for long-distance shooting (the bullets are traveling quite a bit slower than modern rounds). Simply put, these long scopes need the bunny ears. External turret-style adjustments rely on a spring to keep the scope tube pressed against the underside of the turret plunger. If the turret ‘cage’ is big enough to account for the necessary amount of elevation adjustment, there would need to be a very strong and long spring. It’d be hell trying to fit that setup in a gun case, let alone install it. The bunny ear style adjustments ditch the spring in favor of adjustment screws, while separating the windage and elevation adjustment components. You can get quite a bit more vertical travel without drastically increasing the size of the mounts. The trade-off, though, is that this setup cannot use turrets in the traditional sense.
Short scopes do not require as much vertical (or horizontal) movement to make an adjustment. The ‘lever’ - the body of the scope - is shorter. In addition, scopes such as the 8X or 20X are often mounted on a rifle firing .30-06. These cartridges have a little more speed to them, and thus not as much elevation adjustment to reach a good distance.
Even with all these constraints, I’ve used the normal turret adjustments on the 6X Two Tone to send a .45-70 out to 650 yards. If I wanted to send the bullet out to 1000 yards instead, I’d face some difficulty without the bunny ears or blocks of different heights.
The objective end of the scope can either continue the straight-tube shape, or have an objective bell. The objective bell lets in more light than the straight-tube design. Unless you’re hunting at night, both styles are wonderfully bright. During the daytime, the designs with a large objective bell have no significant advantage.
The mounting styles and location can vary wildly between rifles. This is made only more complex by our various no-machining kits. I recommend you check the first section of this article, which details the mounting requirements of each scope. Alternatively, the end of the second section details the various no-machining mounting kits available.
|
Scope |
Parallax Adj |
Length |
Sliding |
Adjustments |
Obj. Shape |
Mounting |
|
8X Gen i |
Yes |
23” |
Yes |
Click Turrets |
Bell |
Crescent cut blocks |
|
8X Gen ii |
Yes |
23” |
Yes |
Click Turrets |
Bell |
Crescent cut blocks |
|
20X |
Yes |
25.75” |
Yes |
Click Turrets |
Bell |
Crescent cut blocks |
|
6X Long Fixed |
No |
30.5”+ |
No |
Bunny Ears |
Straight |
Dovetails, Drill and Tap |
|
6X Long Sliding |
No |
30.5”+ |
Yes |
Bunny Ears (split adjustments) |
Straight |
Dovetails |
|
6X 18” |
No |
18” |
No |
Clickless Turrets |
Straight |
Posa cut blocks |
|
6X 18” Two-Tone |
No |
18” |
Yes |
Clickless Turrets |
Straight |
Crescent cut blocks |
|
3X 17” |
No |
17” |
No |
Clickless Turrets |
Straight |
Posa cut blocks |

Many of our older scopes have turrets for their adjustments. Adjustments are made at the rear ring by turning the turrets. Some turrets have clicks, others do not. In all cases, turning a turret on an older scope performs a similar function as turning a turret on a modern scope - it will adjust windage or elevation, depending on which turrets are being turned.
The scope tube sits inside the rings. Any sliding or locking is handled by the front ring. Adjustments are handled by the rear ring.
The rings on our ‘short’ Malcolm scopes clamp onto ‘blocks’. Blocks and mounting rings need the same ‘crossbolt’ to properly lock in place. There are two varieties of crossbolt: Posa and Crescent.
Block spacing is a concern, due to how it changes index values on the turrets. When the blocks are spaced closer together, adjustments are more coarse. When farther apart, adjustments are more fine. Our scopes have been optimized for easy math at 7.25” spacing between the blocks/rings (center-to-center). If the blocks are spaced a different distance than that, some math may need to be applied. Please see the chart in the next section for values and references.
The adjustments (turrets, rear ring) normally have a very Shakespearean concern: to click or not to click. The Lyman and Unertl style rings click. The Cage and Precision style rings have no clicks. Depending on your degree of historical accuracy, personal preferences, or competition constraints, there are four adjustment rings to choose from.
These scopes will typically require some drilling and tapping to mount properly. The blocks will need to attach to your rifle somehow. They will need to be firmly attached, so two screws per block. Most commonly, they will be attached to the barrel. For some rifle models (such as the Springfield 1903), one block may go atop the receiver.
If you don’t want to drill and tap or you have a scope that requires offset mounting, we may have a kit built specifically for your model of rifle. Not all old rifles have the same specs - from receiver length, height, and thickness to the holes normally provided by the manufacturer.

Our ‘long’ Malcolm scope uses ‘bunny ears’. We have two versions of the bunny ear mounting system: ‘drill and tap’ or ‘direct dovetail’. They are built to handle recoil differently. The Drill and Tap version holds the scope still, but requires that the rear base is mounted very firmly with extra screws. The Direct Dovetail version allows the scope to slide (and thus does not need so much drilling and tapping), but will require a very tight fit at the dovetails to prevent loosening over time.
For the drill and tap version, windage and elevation are both handled at the rear mount. The scope moves up/down in the bunny ears to adjust elevation. The entire base moves left/right to handle windage. Windage is normally set, then loctite’d down. Elevation is adjusted as needed.
For the direct dovetail version, elevation is handled at the rear mount and windage is handled at the front. Due to the lower amount of strain placed on the mounting system, this does not require as much loctite-ing. Both windage and elevation are easily changed by the turning of various screws.
If you don’t want to drill and tap or you have a scope that requires offset mounting, we may have a kit built specifically for your model of rifle. Not all old rifles have the same specs - from receiver length, height, and thickness to the holes normally provided by the manufacturer.
Adjustment values lie within the realm of geometry. Specifically, right triangles and circles. Imagine the scope as a long lever. When you lift up one end of the lever, it’ll tilt. The farther you lift that end of the lever, the more it tilts. This amount of tilt is the angular change in view.
As the front and rear mounts are spaced farther apart, the adjustments will get ‘finer’. When they’re closer together, they’ll get ‘coarser’ (more adjustment per index value). This means that the marks on the index don’t represent particular MOA or distance values. You’ll have to do the math to figure out what they stand for. Or, you can refer to the chart below as a good starting point, then add or subtract a little depending on your particular mount spacing.
These scopes will have minimum and maximum mounting distances, which will vary depending on eye relief, the need to slide, and so forth.

For the short Malcolm scopes (3, 6, 8, 20X), we recommend a spacing of 7.25” between the front and rear mounts, center-to-center [image demarcating measure points]. For the 8X, this keeps the clicks at a ¼ MOA value per click. Looking at this another way - the turrets each have a particular tpi (threads per inch). This thread rate-of-twist doesn’t change. Turning the turret only pushes the (rear of the) scope a particular linear distance per twist of the turret. In the case of the 8X’s normal Lyman or Unertl adjustments, every 4 clicks indicates a move of 0.002”. When the mounts are spaced 7.25” apart, that particular 0.002” move changes the angle that the scope is pointed by 0.016 degrees. That’s 1 MOA. Each individual click is roughly 0.0005” of movement, which comes out to 0.004 degrees; ¼ MOA. Placing the mounts closer together would cause that 0.002” of movement to result in a larger degree of change, >1 MOA.
Below is a chart of mounting distances and adjustment values. If you’re mounting the rings a different distance apart than what is listed below, give us a call and we can do the math for you. You can also break out your old geometry book if you enjoy the math; everything is based on circles and right triangles.
|
Ring Type |
Index desc. |
Linear Dist. |
5.4” spacing |
7.25” spacing |
9.2” spacing |
|
Lyman |
Numbered large lines, with 5 small divisions. Large lines count by 5’s. |
0.0005”/click 0.0011”/line 0.027”/turn 50 clicks/turn |
⅓ MOA / click ⅔ MOA / line 16 ⅔ MOA / turn |
¼ MOA / click ½ MOA / line 12 ½ MOA / turn |
⅕ MOA / click ⅖ MOA / line 10 MOA / turn |
|
Unertl |
Numbered large lines, with 5 small divisions. Large lines count by 5’s. |
0.0005”/click 0.0011”/line 0.027”/turn 50 clicks/turn |
⅓ MOA / click ⅔ MOA / line 16 ⅔ MOA / turn |
¼ MOA / click ½ MOA / line 12 ½ MOA / turn |
⅕ MOA / click ⅖ MOA / line 10 MOA / turn |
|
Precision |
6 numbered lines (0-5). 4 small divisions per number. Alternating line heights. |
0.0005”/line 0.002”/num 0.012”/turn 24 divisions/turn |
⅓ MOA / line 1 ¼ MOA / num 7 ½ MOA / turn |
¼ MOA / line 1 MOA / num 6 MOA / turn |
⅕ MOA / line ¾ MOA / num 4 ½ MOA / turn |
|
Cage |
4 numbered large lines (0 - 3). Two small divisions per number. |
0.0025”/line 0.005”/num 0.020”/turn 8 divisions/turn |
1 ½ MOA / line 3 ⅕ MOA / num 12 ¾ MOA / turn |
1 ⅕ MOA / line 2 ⅖ MOA / num 9 ½ MOA / turn |
1 MOA / line 1 ⅘ MOA / num 7 ½ MOA / turn |
On the long scopes, this change in values is no different. The index style is a little different - rather than wrapping around a turret, the index proceeds flatly along a face. We’ll take a look at the elevation adjustment below:
|
Mount Type |
Index desc. |
22” spacing |
24” spacing |
26” spacing |
|
Drill and Tap |
One major line every inch, ten small divisions per inch |
15 MOA per small division 157 MOA per inch |
14 MOA per small division 144 MOA per inch |
13 MOA per small division 133 MOA per inch |
| Direct Dovetail Mounts | One major line every inch, 20 small divisions per inch |
7 4/5 MOA per inch 157 MOA per inch |
7 1/4 MOA per small division 144 MOA per inch |
6 2/3 MOA per small division 133 MOA per inch |
Each ring or bunny ear has a maximum amount of travel, similar to a maximum amount of adjustment in a modern scope. Depending on mount spacing and the difference in height between the rings, this may affect your maximum and minimum ranges. While there are many possible rifles (with an even greater variety of barrels and tapers), I hope this chart gives you a rough idea of the overall adjustment range of each setup.
|
Adj. Ring Kit |
Ring Offset |
Total V. Travel |
5.4” spacing |
7.25” spacing |
9.2” spacing |
|
Cage |
Front 0.135” higher |
0.220” |
140 MOA |
104 MOA |
82 MOA |
|
Precision |
Front 0.040” higher |
0.265” |
168 MOA |
125 MOA |
99 MOA |
|
Lyman |
Equal height |
0.228” |
145 MOA |
108 MOA |
85 MOA |
|
Unertl |
Front 0.024” higher |
0.280” |
178 MOA |
132 MOA |
104 MOA |
|
Scope Kit |
Ring Offset |
Total V. Travel |
22” spacing |
24” spacing |
26” spacing |
|
6X Long (D&T) |
Rear 0.070” higher |
1.7” |
265 MOA |
247 MOA |
224 MOA |
|
6X Long (D.D.) |
Front 0.050” higher |
1.5” |
234 MOA |
214 MOA |
198 MOA |
Only our ‘Unertl-style’ scopes allow you to set parallax. The other scopes (3X & 6X) are fixed parallax, set for 100 yards. They’ll work well at other distances, but 100 yards is a good standard for some of those older cartridges.
We have two parallax mechanisms:

To set parallax on the 8X scopes: First, remove the sunshade. The sunshade acts as a compression locking ring for the next elements we’ll be dealing with. Once the sunshade is off, you’ll see the parallax adjustment ring and the objective lens housing. When you turn the parallax adjustment ring, it’ll move either farther forward or backward. When it moves forward (for closer distances), you may notice it pushing the objective lens housing forward. When adjusting that same ring rearward (farther distances), something different happens. The adjustment ring backs away from the objective housing, but the housing doesn’t chase after it. You’re going to have to reach forward and push the housing to sit flush with the adjustment ring. It should make a nice, metallic ‘click’ when it hits home. Keep adjusting your parallax until it’s where you need it to be, and push the objective housing in place whenever it’s needed. When the parallax is set, screw the sunshade back on. That’ll keep the objective housing and adjustment rings locked in place.

To set parallax on the 20X scope: You’ll be using two end rings to push around a central ring. The central ring has screws connecting to the objective lens housing inside the bell. As this ring is pushed back and forth, it moves the internal housing. Moving the housing is pretty straightforward - if you want to scoot the housing forward (closer distances), you’ll need to back-off the forward ring. Then, twist the rear ring so that it moves forward, pushing the central ring along with it. When it’s at the right spot, lock the rings in place around the central ring. To move backwards, just do the opposite - back-off the rear ring, chase with the forward ring.
On all our Malcolm scopes, the eyepiece can rotate. Rotating the eyepiece changes the focus on the reticle (please note, this is different from the parallax/target focus). Once the reticle is nice and crisp, turn the lock ring until it’s tight against the eyepiece.
Determining reticle focus is best done with whatever eye protection you’ll be using when shooting. If you shoot with prescription lenses, make sure to set your reticle focus while wearing those same lenses.
Setting reticle focus is easiest to do if you point the scope towards something plain. In most situations, this means that you can point the scope at a clear blue sky. If you’re indoors, a solid-color wall works pretty darn well too.
With the scope pointing at this nondescript background, rotate the eyepiece a little bit at a time. Treat yourself like your own optometrist, asking, “is this position better or worse?” Fairly quickly, you’ll find the optimal eyepiece setting to hone in your reticle sharpness. Then, simply turn the eyepiece lock ring (the ‘collar’ adjacent to the eyepiece) until it locks the eyepiece in place. Unless your prescription changes or you remove the eyepiece for some reason, you’ll never need to change this setting again.
For modern scopes, the mounting rings are set forward and backward on a rail, and the scope is slid forward and backward to set it at the proper position. Once the scope is set at the proper eye position, it will remain there. Still, if you need to change it, you can simply move the rings forward or back, or scoot the scope around in the rings.

For these older Malcolm scopes, the mounting blocks are stuck in one place. There’s no ‘rail’ to move forward and back on. It’s recommended that you mock-up how you’ll mount the scope before you go drilling and tapping, just to make sure it’ll fit right where you want it to be. Even if the rings aren’t in the optimum spot, though, adjusting the normal position of your scope is pretty easy. For most of our scopes, you can also level the reticle at the same time.
Once the scope tube is installed in the rings, you can adjust the eye relief by moving the ‘stopping point’. Each of these scopes will have a particular stopping point, usually in the form of a ‘lock ring’. I’ll detail each below:
Modern scopes don’t slide. At least, they shouldn’t - that would mean the rings are loose. Early (‘old’) scopes, however, often did slide. The reason was simple: reticles were made from quite fragile stuff, such as human hair, horse hair, or spider silk. When the scope slides, it ignores quite a bit of the recoil from the rifle. This, in turn, saves the reticle from all that recoil.
Material science has come a long way, and our Malcolm scopes have reticles that can withstand truly devastating amounts of recoil. They do not need to slide to save the reticle. In this way, the sliding is somewhat just a stylistic choice.
As a side note - though it seems like the scope is moving forward, it’s really the rifle that is moving backward. The scope simply hangs in place as recoil pushes the rifle backward underneath it.
After each shot, the scope needs to be pulled back into place. The normal ready to fire position is known as battery. This is the normal starting position of the scope, where it sits with the proper eye relief. As the scope slides forward with each shot, it will get farther from your normal cheek position. You can either constantly chase the scope by moving your cheek position, or instead pull the scope back to you and remain comfortable.
Without returning the scope to battery, it may eventually slide so far forward that it is stopped by some other component.
Eye relief, too, has been solved more recently than you’d expect. The first ‘rifle telescope’ had no eye relief. When Charles Willson Peale fired his rifle in 1776, he was the first to learn about scope bite. Even the WWI-era Warner & Swasey prism scopes mounted on the M1903 had an eye relief of only 1 inch. Soldiers had to use eye cups to try to reduce the damage to their faces, but could not avoid it entirely.
Our Malcolm scopes have an eye relief of between 3-4”, depending on the model. If you’re bracing the rifle properly, you’ll avoid scope bite in the same way that you will with a modern scope. For very strong cartridges (such as a .45-70 firing 500gr bullets), a scope that slides will help you avoid accidents caused by an improper hold. The scope slides nicely out of the way with the recoil.
Externally-adjusting scopes have another strange concern that sets them apart from modern scopes. When adjustments are made, the tube of the scope tilts. Much like a tilting lever in physics problems, the scope needs a fulcrum that allows some movement. Adjustments are made at the rear of the scope, so the front ring provides a pivot point. As such, the front ring needs a little play to allow the scope to move.
If the scope is meant to not slide, it has a locking ring or rings on the tube that prevent it from moving forward. Unlike modern scope rings that grab the scope with a great deal of surface area, these locking rings are somewhat narrower and must still allow the scope to tilt at the fulcrum. For very strong cartridges, such as a .45-110, repeated shots may cause a held-in-place scope to slide fractions of an inch with each shot. In cases such as this, it’s a good idea to let the scope slide instead of holding it in place. For cartridges such as .30-06, the scope can be held in place with no issue. For the .22LR, even a sliding scope might not move when a round is fired.
For weaker cartridges, such as lever actions firing pistol cartridges or even a .45-70, the scope can remain tightly in place with no issues. The choice to slide is entirely yours. I usually prefer a sliding scope if the recoil is high - this way, there’s never a chance for scope bite if I’m not bracing the rifle properly.
A sliding scope provides one other peculiar benefit, mostly for single-shot rifles such as a Sharps or High Wall. The eyepiece of the scope normally hangs over the cartridge loading area. People with large hands and low-mounted scopes might find removing a cartridge difficult at times. If you push the scope forward out of the way, it is no longer in the way. After loading a cartridge, you can easily pull the scope back into position.
Sliding scopes do not slide as much as you might expect. On a .30-06, depending on the rifle weight and cartridge specifications, the scope will slide around ¾”. On a .45-70, it might slide 1 ¼”. A .22LR is unlikely to make a scope slide noticeably with each shot, even if the scope is meant to.
For example: If you wanted to mount an all-black 3X scope (non-sliding) on a rifle firing .45-90 (high recoil), it’s recommended that you set up the scope to slide. By changing the lock ring to a ‘sliding lock ring,’ the scope is able to slide. If you wanted to put an 20X Unertl scope (sliding) on a rifle firing .22LR and didn’t want it to move, you could scoot one of the lock rings forward until it stops against the front ring. The scope would then be held in place and wouldn’t require you to pull it back into battery.
Sliding scopes can be equipped with a return spring. This is a spring that pushes the scope back into place, so you don’t have to move it by hand. This spring is typically not allowed in competitions, as it wasn’t standard on military-issued rifles of the era.
In this section, I’ll break down each of the integral components of these scopes. This is here to answer the question: Can Part A fit on Scope B?
It will be divided into five main sections:
To make a long story short: Our externally-adjusting Malcolm scopes have the same tube diameter (¾”). Many parts will fit on many different scopes. However, some parts just don’t play well with others, despite being able to fit. I hope this chapter explains why.
Please note - while some parts will technically fit onto certain scopes, it may not be recommended. When I mention that something is not recommended, I consider it a very strong warning against trying that particular combination.

This is the classic rear ring from our 8X Gen i scope. It utilizes small steel plates (known as “F Plates”) to enable the click mechanism. The F Plates also ride against the scope body, providing a replaceable friction surface to handle the wear of the scope’s sliding movement.
The turrets can be reindexed by loosening the set screws around the turret head’s perimeter, then turning to the appropriate position.
The ring mounts onto blocks with a Crescent cut crossbolt.
Will it work?
|
Scope |
8X |
20X |
3X/6X Black |
6X Two Tone |
6X Long |
|
Notes |
Yes |
Will fit, but not recommended due to limited adjustment range |
|||

The standard rings on our new 8X Gen ii scope as well as the 20X Target scope. This is a highly precise, CNC-machined piece of historical appreciation. Based on the designs from Unertl scopes of old, it quickly became a frontrunner in the vintage sniper competition field.
The turrets can be reindexed by loosening the top screw, rotating the turret to the appropriate position, then tightening down the top screw again (finger tight).
The ring mounts onto blocks with a Crescent cut crossbolt.
Will it work?
|
Scope |
8X |
20X |
3X/6X Black |
6X Two Tone |
6X Long |
|
Notes |
Yes |
Will fit, but not recommended due to limited adjustment range |
|||

Built primarily around designs from the Chapman-James era, this round-sided adjustment ring features deceptively simple turrets. The turrets do not click, but have locking nuts that ensure no movement of the turrets under recoil.
The ring mounts onto blocks with a Posa Cut crossbolt.
Will it work?
|
Scope |
8X |
20X |
3X/6X Black |
6X Two Tone |
6X Long |
|
Notes |
Yes |
Will fit, but not recommended due to limited adjustment range |
|||

A highly precise design originating from the latter half of the 1800s. The turrets are of a tall top-hat design with index markings around the perimeter, allowing easy reading of the position without unmounting from the rifle. The turrets can be locked in place by locking nuts, preventing movement during recoil.
The ring mounts onto blocks with a Crescent Cut crossbolt.
Will it work?
|
Scope |
8X |
20X |
3X/6X Black |
6X Two Tone |
6X Long |
|
Notes |
Yes |
Will fit, but not recommended due to limited adjustment range |
|||

This rear adjustment setup for the 6X long scope is made of a handful of important parts, which combine to hold a scope firmly in place. The foundation start with a dovetail block. The block is replaceable and can be swapped for blocks of sizes other than the standard ⅜”. Attached to this piece is a ‘heavy duty base,’ which is also drilled and tapped onto the barrel. Atop all this sits the bunny ears, sandwiching down onto a flatspring sitting on the heavy duty base. The bunny ears are fastened down by screws going through a windage plate. By loosening these two screws, the bunny ears can be pushed side to side through turning of the windage screws. The scope sits firmly in between the bunny ears, held in place by a collar. The collar’s crossbolt can be loosened to allow the scope to move up and down, changing elevation. An index sits on both the collar’s face and the left bunny ear.
This rear adjustment is built to hold a scope in place. It cannot be set up to allow the scope to slide.
Will it work?
|
Scope |
8X |
20X |
3X/6X Black |
6X Two Tone |
6X Long |
|
Notes |
Due to limits imposed by the front ring’s allowance for movement, the position of dovetail slots, and objective bell clearance, these combinations are not recommended. |
Yes |
|||

Toward the waning years of the 1800s, Malcolm designed a rather robust and mechanically marvelous in-line mounting kit. Based on his old designs, we’ve taken things a step farther with improved materials, greater vertical travel, and adjustments crafted for repeatable precision.
This component sits at the rear of the scope and provides only elevation adjustment. Normally, windage adjustment would be handled by the front ring that accompanies this rear ring in the kit.
The mount begins with a dovetail block, inserted into a dovetail cut at the rear of the barrel. This dovetail block needs to fit tightly (gentle hammer kind of tight) into the dovetail to ensure no movement. Blocks will typically start on the upper side of sizing tolerances, so that they can be filed down to fit your individual rifle. There is also a set screw in the dovetail block to ensure it remains locked in place - especially if loctite is involved!
The bunny ears are screwed down onto the dovetail block. The scope is positioned in between the ears via a collar. The collar’s crossbolt connects to a vertical screw. By loosening the crossbolt and rotating the turret at the top of the bunny ear, the scope’s elevation can be changed.
This mount is designed to allow the scope to slide.
Will it work?
|
Scope |
8X |
20X |
3X/6X Black |
6X Two Tone |
6X Long |
|
Notes |
Due to objective bell size, and lack of windage adjustment, this is not recommended |
Due to scope length, allowable movement at the front ring, and lack of windage adjustment, this is not recommended |
Yes |
||

This part set allows the traditional Drill and Tap Bunny Ears to have a vertical adjustment screw, making precision elevation adjustments easier overall. It cannot be adapted for use with any other mount or ring.
Will it work?

This collar wraps around the main scope tube. It is a sturdy, tightly-fit steel stopping point that prevents a scope from moving. To fasten in place, tighten the two screws at the top of the locking collar.
This piece is generally used to prevent the 6X long scope from sliding.
Will it work?
|
Scope |
8X |
20X |
3X/6X Black |
6X Two Tone |
6X Long |
|
Notes |
No - interference from rail. |
Can fit, but is superfluous to the locking ring that fits into the normal front ring. Not recommended. |
Yes |
||

This design features a tall top cap. Inside of the top cap sits a spring and plunger. The plunger is shaped to create a channel for a rail to slide down. The plunger is what allows the scope to slide without rotating (and thus skewing the reticle). There will be a small amount of play - a few thousandths - to allow the rail to fit without sticking.
This ring fastens onto a normal block with a Crescent Cut crossbolt.
Will it work?
|
Scope |
8X |
20X |
3X/6X Black |
6X Two Tone |
6X Long |
|
Notes |
Yes |
Yes - but will require the part ‘18SLR’ to enable the scope to slide. |
Can fit, but poses adjustment / positioning problems with the 6X rear ring. Not recommended. |
||

This ring comes standard with the 3X and 6X ‘all black’ scopes. It has a relatively low-profile design, with a spring and plunger hidden under the scope to ensure a constant contact between the scope tube and the ring. In its normal configuration, it is built to prevent the scope from sliding under recoil. However, swapping out the lock ring for one that slides (specifically the 17SLR) will allow a scope to slide.
The ring uses standard blocks with a Posa Cut crossbolt.
Will it work?
|
Scope |
8X |
20X |
3X/6X Black |
6X Two Tone |
6X Long |
|
Notes |
No - interference from rail |
Yes |
Can fit, but poses adjustment / positioning problems with the 6X rear ring. Not recommended. |
||

The standard front ring for the 6X Long Malcolm Scope (D&T Mounting). This ring holds the scope aloft with an underside spring. The standard ring fits into a ⅜” dovetail cut, standard on most rifle models.
With the standard ring, the scope is able to zero at roughly 200 yards (depending on cartridge and load). It maximizes the potential long-range distance of the scope.
Will it work?
|
Scope |
8X |
20X |
3X/6X Black |
6X Two Tone |
6X Long |
|
Notes |
No - interference from rail |
Though the size is correct, there is no place to install the slide stop. Not recommended. |
Yes |
||

A replacement front ring for the 6X Long Scope (D&T Mounting). This ring is built for a setup that does not slide, and fits into a standard ⅜” dovetail.
This front ring is significantly taller than the standard front ring, allowing for much closer zeroing distances. This ring can also be used to compensate for a heavy taper in the barrel. Ultimately, this will lead to a reduced maximum range.
Will it work?
|
Scope |
8X |
20X |
3X/6X Black |
6X Two Tone |
6X Long |
|
Notes |
No - interference from rail |
Though the size is correct, there is no place to install the slide stop. Not recommended. |
Yes |
||

Introduced as the front half of the 6X Long Malcolm Direct Dovetail mounts, this particular ring can adjust the windage of the scope. This front ring slides into a dovetail cut at the muzzle-end of the barrel. Different dovetail sizes exist, and we have different dovetail block sizes to accommodate this.
The dovetail block is different from our normal dovetail block design. It is a little taller, has half of an index on one side, another dovetail-like trapezoidal shape on top, and threaded holes on the left and right. The index matches up with the index found on the attached ring piece. The actual ring portion of this set slides onto the upper dovetail-like portion of the dovetail block. It is pushed left and right by screws that thread into the holes mentioned earlier.
In sum total, the windage-adjusting front ring contains the following pieces:
Will it work?
|
Scope |
8X |
20X |
3X/6X Black |
6X Two Tone |
6X Long |
|
Notes |
No - interference from rail |
Though the size is correct, there is no place to install the slide stop. Not recommended. |
Yes |
||
This ring sits at the very front end of the 6X Long Malcolm scope. It’s a rather straightforward ring design, with three set screws around the perimeter. The set screws hold the ring firmly in place on the scope itself. The ring has an indexing tab, meant to fit into a divot at the front of the ‘windage adjusting front ring’.
Due to the design of this ring and how it’s purpose-built to function with the windage adjusting front ring, it will only work in conjunction with the 6X Long Scope Direct Dovetail mounts. Though it may fit on other ¾” tubes, it is not designed as either a recoil-stopping device or a locking device.

This ring is meant to fit into the standard front ring that comes with the 3X and 6X Short Malcolm (all black) scopes. It will not fit any of the other front rings, and would interfere with the use of any rear rings.
This ring comes standard with the 6X ‘Two Tone’ Short Malcolm scope. It is meant to fit into the ring that comes with this scope and the 8X Malcolm scopes (the ring with a top-cap and rail-follower). This ring allows a scope to slide, granting a stopping point (for resetting to battery) and a rail (to maintain scope alignment).
If combined with the sliding front ring found on either 8X scope or the 6X ‘Two Tone’, the sliding locking ring can allow a short scope to slide under recoil. This ring is a substitute for the rail commonly found on the 8X scopes, and so it is only necessary for the 3X or 6X Short Malcolm scopes that do not have a rail. Meanwhile, the 6X Long Malcolm scopes utilize an entirely different mounting system.
The ‘return spring’ works in conjunction with the standard ‘pope rib’ or the ‘sliding locking ring’ to return a sliding scope to battery position after recoil. This spring will only work when used with either an 8X scope (Gen i & Gen ii) or a Short Malcolm scope featuring the ‘sliding locking ring.’
The 6X Long Malcolm scope does not provide adequate mounting space for the spring to serve a purpose.
The ‘heavy duty base’ provides a stronger, recoil-resistant mounting solution to the 6X Long Malcolm Drill & Tap rear mount. It fastens to the top of the dovetail block with 2 screws. 3 more potential fastening spots are provided forward of the dovetail block. Some drilling and tapping of the barrel may be required, at which point the heavy duty base can be fastened onto the barrel with loctite’d screws. It is recommended that at least 2 screws are used for cartridges of .45-70 or stronger.
The ‘heavy duty base’ will only work with the 6X Long Malcolm D&T rear mount.

The sunshade is an extension added to the 6X Long Malcolm scope. By adding a sunshade of the appropriate length, the scope can be installed with proper eye relief and can extend to meet the front dovetail, where the front ring is installed.
The sunshade can conveniently fit into the objective end of the 6X ‘Two Tone’ Short Malcolm scope if you need it, though it lacks the proper support to serve as a location for the front ring.
For the Long Malcolm scope, the recommended sunshade lengths / barrel lengths are listed below: